
Making Android Studio pretty
Today, during a glorious transition from 1.5 rc1 to 1.5 Android Studio decided to keep all of my settings completely intact, with the honorable exception of GUI and syntax themes and LogCat colors, which were just gone. Being me, I had not the slightest recollection on how the previous combo have gotten into my editor and I had to search for everything again. Not particularly enjoying the process of rediscovery, I decided to keep it stashed somewhere, both for the future me and maybe for some curious souls that happen to bump onto my blog.
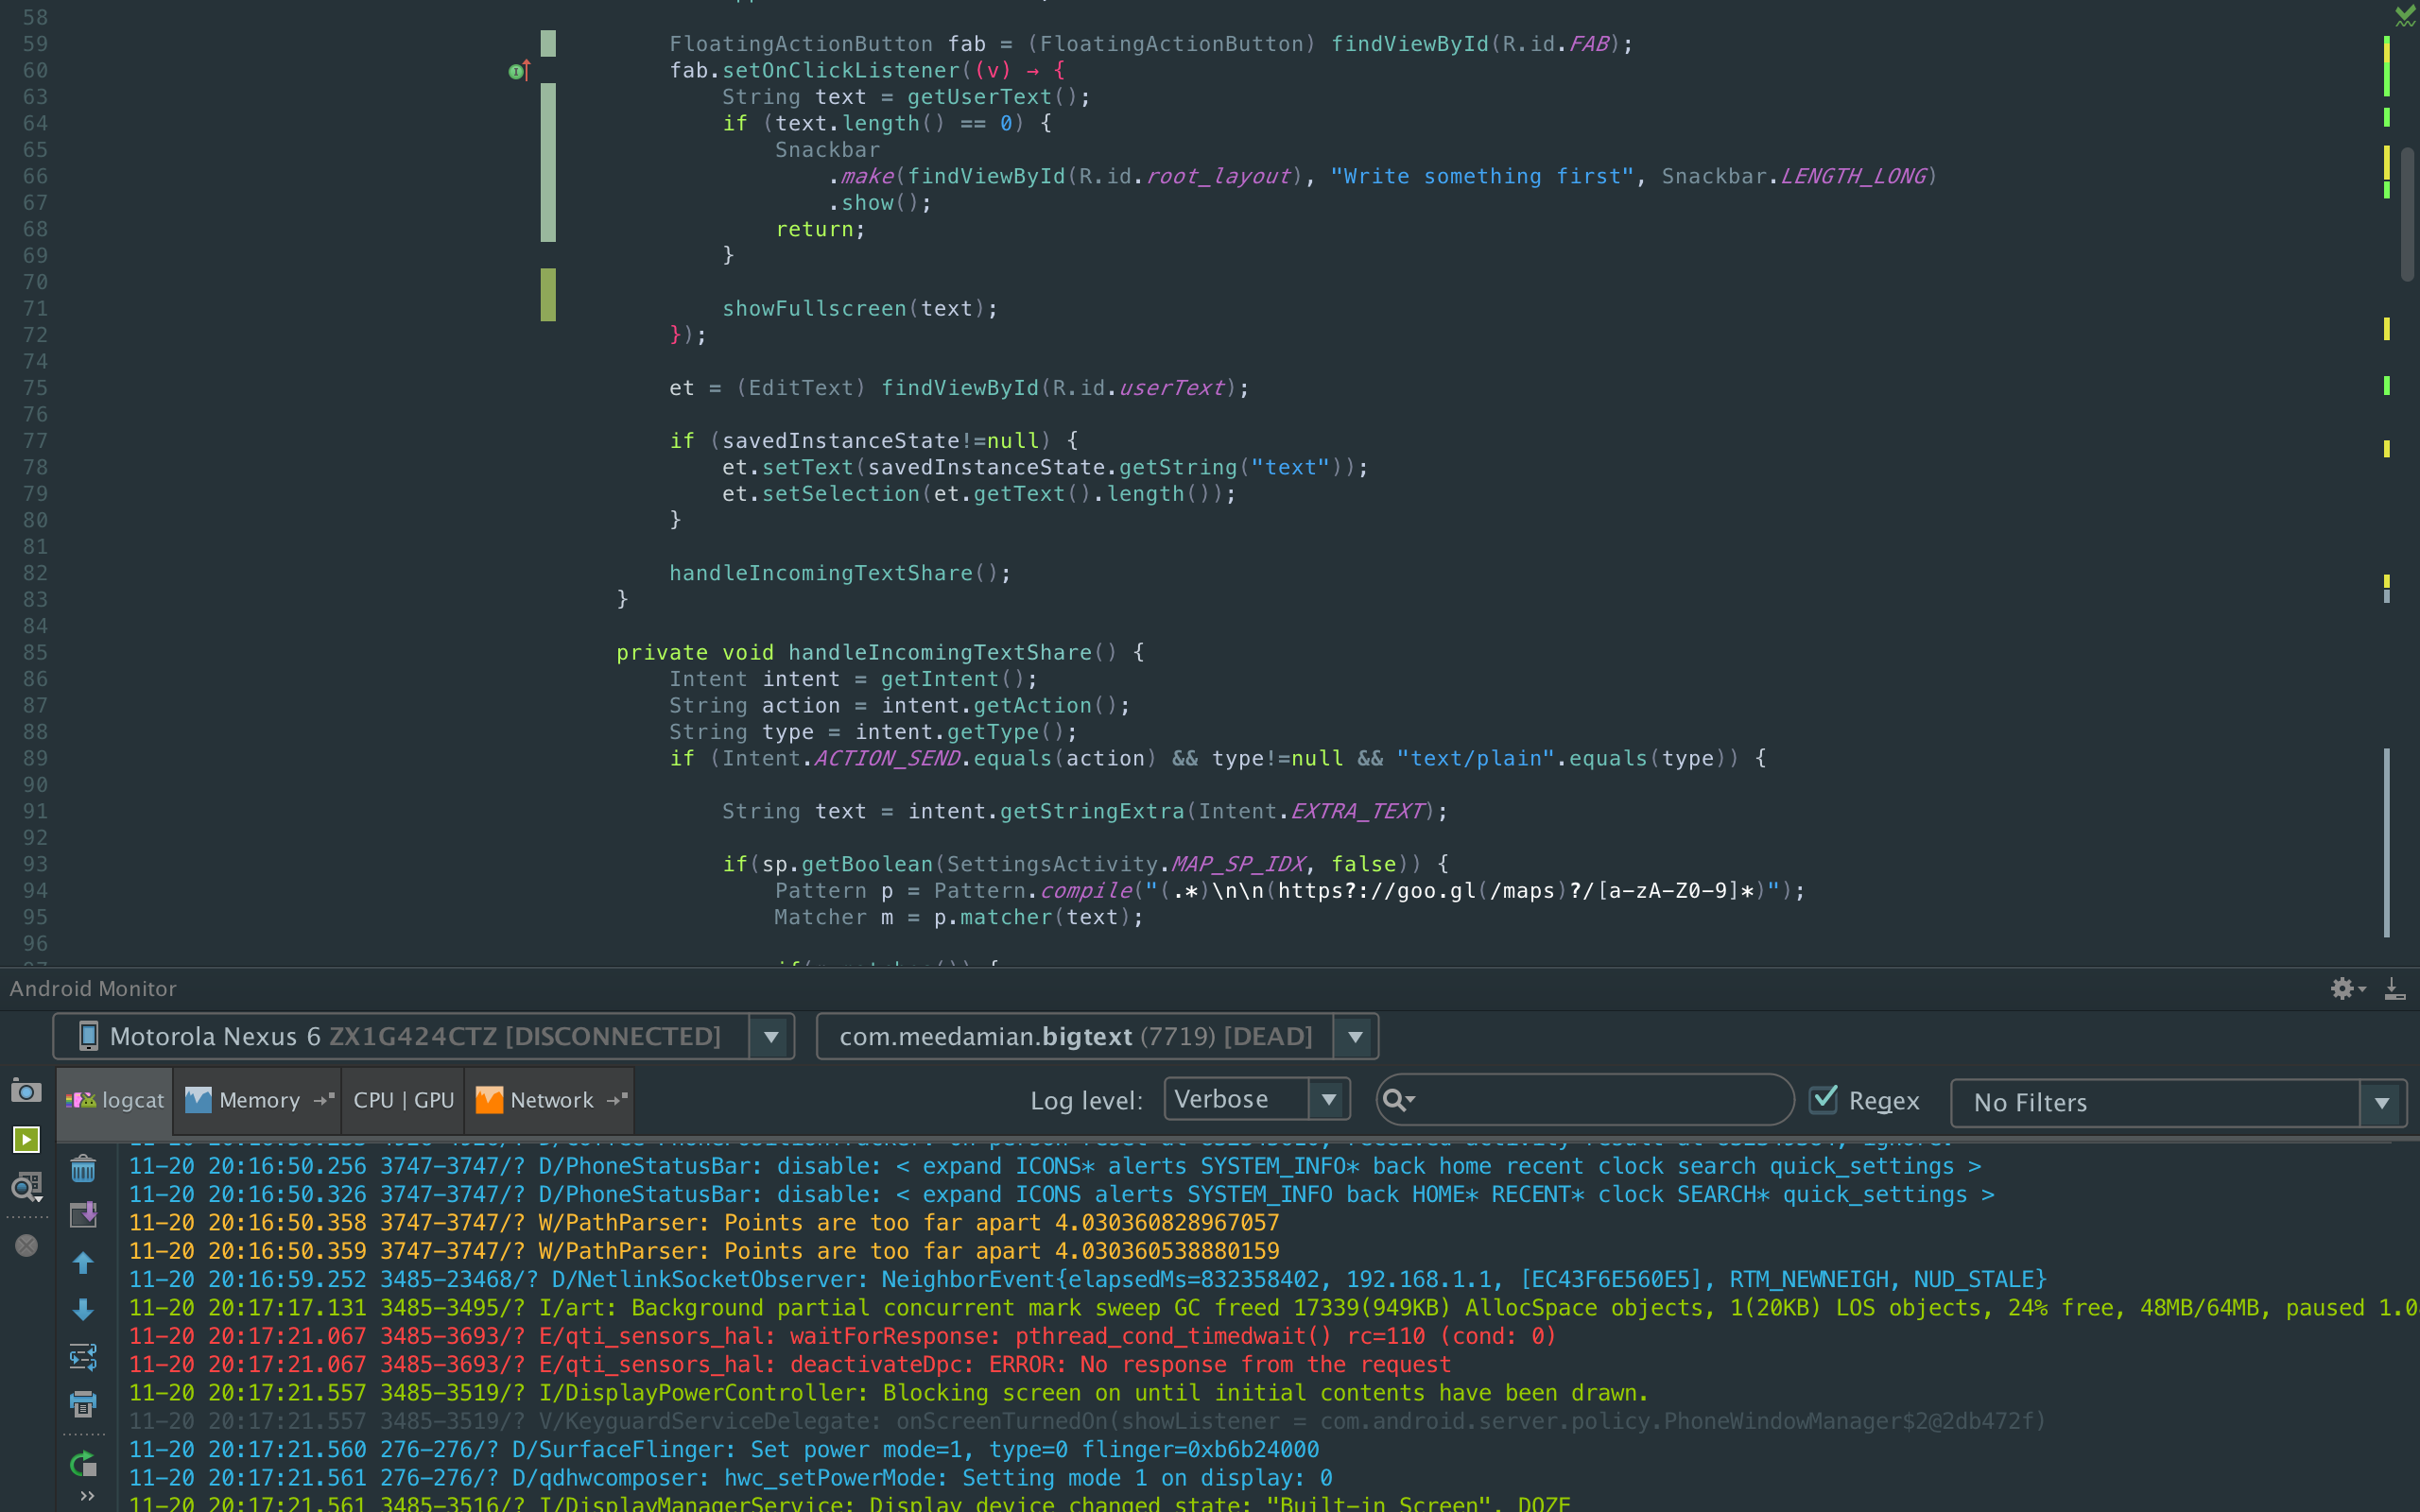
Final appearance More below
1. GUI Theme manual from here
- Open the Settings/Preferences dialog (OSX/Unix:
⌘+,, Windows:Ctrl+Alt+S) - In the left-hand pane, select Plugins.
- Click Browse repositories… and search for Material Theme UI
- Click Install plugin and confirm your intention to download and install the plugin.
- Click OK in the Settings dialog and restart for the changes to take effect.
tl;dr: ⌘⇧a → "Plugins" → ↩ → ⌃⌥b → <search> → "Material Theme UI" → [Install plugin] → ⌃⌥c → ⎋ → <restart>
NOTE: No need to set schema as we’ll be using a different one.
2. Editor Schema manual from here
Find plugin
- Open IDE and locate
File >> Settings >> Pluginsand click Browse Repositories… - Search for and click ChroMATERIAL and click Install plugin
Use Color Scheme
- Locate
File >> Settings >> Editor >> Colors & Fonts >> Scheme - Choose ChroMATERIAL and click Apply/OK.
tl;dr: ⌘⇧a → "Plugins" → ↩ → ⌃⌥b → <search> → "ChroMATERIAL" → [Install plugin] → ⌃⌥c → ⎋ → <restart> → ⌘⇧a → "Color Scheme" → [3. ChroMATERIAL] → ↩
3. HOLO Logcat
Type Color verbose: #BBB debug: #33B5E5 info: #9C0 assert: #A6C error: #F44 warning: #FB3
- Go to
Preferences → Editor → Colors & Fonts → Android Logcat, - Make sure that ChroMATERIAL is selected in dropdown, and click Save as…,
- Choose a name ex. ChroMATERIAL + HOLO and confirm with OK,
- Click on each item from the list in the center and change their Foreground color to the one from table above,
- Click Apply/OK.
tl;dr: ⌘⇧a → "Android Logcat" → [Save as...] → "ChroMATERIAL + HOLO"¹ → ↩ → <set foreground colors as in the table ↑> → ⎋
¹ - any other name is fine too
Screenshots open in the same tab
 |
|
|---|---|
 |
 |
Flashing an OTA update onto your Nexus
Mandatory intro
OTA stands for Over The Air. Those update files are usually delivered wirelessly directly to your device, but as it usually happens gradually, you might get your update couple of days, weeks or even months after the rollout starts. Luckily there are ways to accelerate that process. Among all the people who get OTAs first there usually is couple of people willing to manually extract them from their device, and share with others on websites like Android Police.
Before you start
You need to figure out 4 things:
- How to enable adb debbuging on your handheld,
- How to install adb on your computer,
- What’s your Device Name and
- What’s the Build number you’re currently on (Settings ⇨ About Phone/Tablet ⇨ Build number).
Make sure everything matches
After you download your OTA you’ll have a file like that:
$ <irrelevant-characters>.signed-<DeviceName>-<yourBuildNumber>-from-<newBuildNumber>.zip
Example, for Nexus 6 (aka shamu) running on Android 5.1.1 (MRA58K), an OTA upgrading it to Android 6 (LMY48T) would be:
$ 6035ff8ac2acfe9017a7dc2e7ae4bbc926bddfb4.signed-shamu-MRA58K-from-LMY48T.zip
Reboot to recovery
Plug your phone into your computer and
“N00b” way
If everything checks out, then:
- switch off your phone,
- press and hold Power and Volume Down buttons until things happen,
- use volume buttons to select “Recovery Mode”,
- press Power button to confirm,
“Hacker” way
$ adb reboot recovery
Do some more button squeezing
When you see a cracked open Android with a red exclamation point above it and it says “No command.” below, then your phone is completely bricked.
It isn’t actually. Just press Power and Volume Up simultaneously and then use Volume buttons to select “apply update from ADB”.
Run the command
cd to your Downloads directory (or wherever .zip file is) and run adb sideload <file name>, example:
# replace "Downloads" and file name accordingly
$ cd ~/Downloads
$ adb sideload 6035ff8ac2acfe9017a7dc2e7ae4bbc926bddfb4.signed-shamu-MRA58K-from-LMY48T.zip
Wait and enjoy
After approximately one infinity, updating and app optimizing should conclude, and you’ll be able to enjoy your new, updated system.
Publishing with Gradle (Revisited)
tl;wr: use this.
Paragraph that everybody will ignore
Since my last post a lot has changed, broken down and new things are possible. Let’s see what can be done now.
Configuration
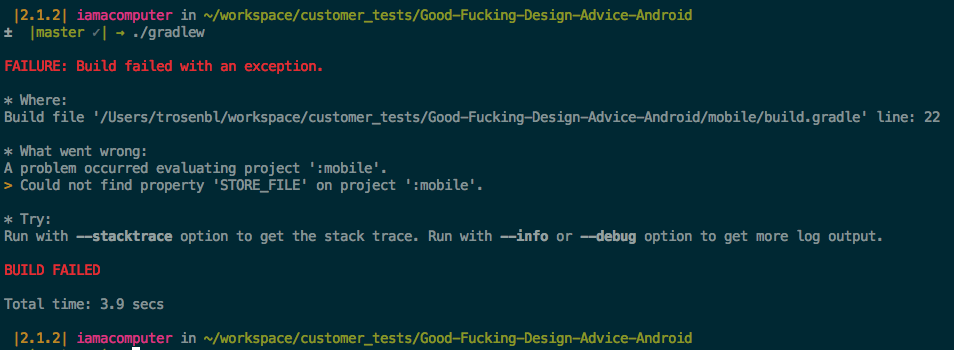
Handling missing variables
Previously gradle.properties contained sensitive info (passwords, duh), so it had to be .gitignore‘d, that caused Could not find property errors just after repo clone and was unusable on CI systems. It can be fixed by adding:
// returns value of requested variable or default (as a fallback)
String safeGet(String name, String defaultValue = '') {
  hasProperty(name) ? project[name] : defaultValue
}
// returns file from a path provided in properties file
File safeGetFile(String name) {
    String fileName = safeGet(name, null)
    fileName != null ? file(fileName) : null
}
And replacing all project.VARIABLE occurunces with safeGet('VARIABLE'). Use safeGetFile('VARIABLE') to get files.
NOTE: Variable name is quoted in a function call.
That little trick disables instacrash™ functionality on the gradle part.
Extracting secret variables
Now, let’s get local gradle.properties file back to the repo. To do that we need to move all super-secret variables somewhere safe and outside of the repo. Luckily, gradle by default also reads its global properties file: ~/.gradle/gradle.properties.
# release builds dir
# That's the default releases dir, you can override it
# for a specific project in its local gradle.properties file.
RELEASES_PARENT_DIR=/Users/mee/dev/android/binaries/

# release build signing
STORE_FILE=/Users/mee/dev/android/keys/keyname
STORE_PASSWORD=superSecretKeyPassword

# if you use one (or default) key for all apps you can include
# KEY_ALIAS and KEY_PASSWORD here. I discourage it though.
Setting local properties
The only required variable in a local gradle.properties is KEY_ALIAS.
# Override name of the folder created in RELEASES_PARENT_DIR;
#   default is project name
FOLDER_NAME=designAdvice

# Name of the key used to sign APK in this project
KEY_ALIAS=myKeyAlias
NOTE: Remember to remove gradle.properties exclusion from .gitignore file.
If you use the same password for store and its keys you can skip to the next section, otherwise there’s one more thing to do.
Setting key-specific password
Create secret.properties file in the project root:
# Key-specific password
KEY_PASSWORD=AnotherSuperSecretPass
IMPORTANT: remember to add this file to .gitignore!!!
Then create a function to safely attach properties to the project object:
// attach new global property to the `project`. Will not override by default
def safeLoad(String name, Object value, Boolean override = false) {
  if (!hasProperty(name) || override)
    project.set name, value
}
And finally load properties from a file:
// loads variables from a file to `project` so they can be `safeGet`-ed later
File secretPropsFile = file('../secret.properties')
if (secretPropsFile.exists()) {
  Properties p = new Properties()
  p.load(new FileInputStream(secretPropsFile))
  p.each { name, value ->
    safeLoad name as String, value
  }
}
IMPORTANT: this last snippet must be above android {} declaration.
Signing and getting release builds
Release APK
Once that is setup, let’s take care of output APK file:
  buildTypes {
    release {
      proguardFiles getDefaultProguardFile('proguard-android.txt'), 'proguard-rules.pro'
      signingConfig signingConfigs.release as Object
      minifyEnabled true
      zipAlignEnabled true

      /* construct releases dir.
        Default is `~/APKs/<projectName>`
      */
      File releasesDir = new File(
        safeGet('RELEASES_PARENT_DIR', '~/APKs'),
        safeGet('FOLDER_NAME', project.group as String)
      )

      // create path if doesn't exist
      if (!releasesDir.exists())
        releasesDir.mkdirs()

      android.applicationVariants.all { variant ->
        variant.outputs.each { output ->
          if (output.name == "release") {

            /* base file name in a form of:
              [package]-[versionType]-[versionName]-[versionCode]
              ex. com.meedamian.testApp-release-1.0.0-1111
            */
            String fileName = [
              defaultConfig.applicationId,
              project.name,
              defaultConfig.versionName,
              defaultConfig.versionCode
             ].join('-')

            // set desired path and name of the output APK file
            output.outputFile = new File(releasesDir, fileName + '.apk')

            // mapping.txt file code
          }
        }
      }
    }
  }
Proguard’s mappings.txt file
If you’d also want to move mappings file replace // mapping.txt file code with:
// copy mappings.txt
if (variant.getBuildType().isMinifyEnabled()) {

  File mappingDir = new File(releasesDir, 'mappings')
  if (!mappingDir.exists())
    mappingDir.mkdirs()

  assemble << {
    copy {
      from variant.mappingFile
      into mappingDir
      rename 'mapping.txt', "mapping-${fileName}.txt"
    }
  }
}
(Optional) Auto-incrementing versionCode
I know it’s nasty, and I would love to see suggestions on how this can be done better :).
Put this anywhere in build.gradle:
Integer getBuildVersion(defaultVersion, Boolean increment = false) {
  File verFile = file('../version.properties')

  if (!verFile.canRead())
    verFile.createNewFile()

  Properties props = new Properties()

  props.load new FileInputStream(verFile)
  String currentCodeVersion = props['VERSION_CODE']

  if (currentCodeVersion == null)
    currentCodeVersion = defaultVersion ?: android.defaultConfig.versionCode

  if (increment) {
    Integer bumpedCodeVersion = currentCodeVersion.toInteger() + 1
    android.defaultConfig.versionCode = bumpedCodeVersion

    props['VERSION_CODE'] = bumpedCodeVersion.toString()

    props.store verFile.newWriter(), "Build version updated with each release build"
    currentCodeVersion = bumpedCodeVersion
  }

  currentCodeVersion as Integer
}
Replace all versionCode references with calls to getBuildVersion():
First one is defaultConfig definition:
defaultConfig {
  applicationId "com.yourPackage.someMore"
  minSdkVersion 15 // because #minSDK15
  targetSdkVersion 22
  versionCode getBuildVersion(1)
  versionName "0.0.1"
}
Second one is fileName construction:
String fileName = [
  defaultConfig.applicationId,
  project.name,
  defaultConfig.versionName,
  getBuildVersion(android.defaultConfig.versionCode, true)
].join('-')
Publishing to the Play Store
It appears that it’s a wider topic and I’ll address it in a next post. (But if you don’t feel like waiting - use this awesome plugin).
Edits
Since originally published this article was edited:
And that’s it. Here’s a complete version again.