Faster git deployment
This trick let’s you push to two repositories with one command. It is great for projects that need really rapid development and aren’t yet populated by many users. Before using make sure that deploying with every git push will not result with catastrophic consequences.
I assume Github for version control and Heroku for hosting, but it works with any remote Git repository and Cloud Platform offering deployment by git.
First, repo needs to be created:
$ git init
$ git remote add origin git@github.com:meeDamian/meeDamian.github.io.git
or cloned:
$ git clone git@github.com:meeDamian/meeDamian.github.io.git
Second, add heroku remote:
$ git remote set-url origin --push --add git@heroku.com:meedamian-com.git
Previous command replaces Github’s push remote. To re-add it:
$ git remote set-url origin --push --add git@github.com:meeDamian/meeDamian.github.io.git
If everything went well you should get something like this:
$ git remote -v
origin  git@github.com:meeDamian/meeDamian.github.io.git (fetch)
origin  git@heroku.com:meedamian-com.git (push)
origin  git@github.com:meeDamian/meeDamian.github.io.git (push)
Done :)
To push&deploy, after some commits, just:
$ git push
Let me know if you think this trick is awesome, terrible or you know how to improve it even further!

Publishing with Gradle
Redundant intro
As I started my Android journey with Eclipse I was used to wizards like this:
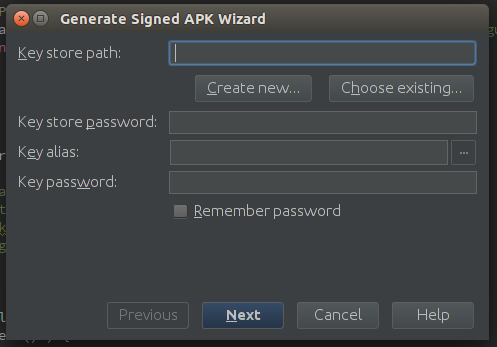
So, you can imagine my surprise when this happened (if you can’t access this link click here). It was unexpected, but pushed me to learn more about Gradle build system. At first gradle docs seemed really overwhelming, because they were covering so much more than only publishing production builds (more about that in my future posts).
Step 1 - Know what to click
That’s something extremely simple and crucial to make anything else work, yet it took me quite some time to find out.
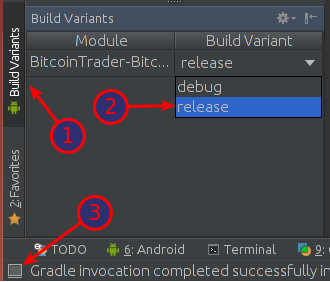
In your Android Studio press 1 to reveal Build Variants menu, then from a dropdown list 2 select release
variant. If those border tabs are not visible you can reveal them by pressing 3.
NOTE: don’t worry if you don’t have release there yet - it will show up once we write our script.
Step 2 - Know “the code”
I have evolved through 3 different flows until I’ve found the one I like the most. As the last one is also
the most complex I’ll cover all 3 of them, so you can choose the one you like to most:
I have evolved through 4 different flows. Last one was created with help from +Mycelium and +Hugo Visser after I’ve published that post.
- Convenient flow - keep credentials in
build.gradlefile, - Shared Repo flow - input credentials in console,
- Awesome flow - keep credentials in a separate and
.gitignored file, - Perfect flow - Similar to Awesome, but way slicker!
Step 3 - Know where to look
Last thing you must do is to actually retrieve your awesome .apk file. This is quite straight forward, but you have to
leave your IDE and point your file manager to:
cd MyProject/MyApp/build/apk/
The only file that interests you now is called: MyApp-release.apk.
I usually copy that file to some external directory, and rename it to sth like: MyApp-<versionName>.apk
Flows
Convenient flow
This flow is really simple all you have to do is to just input your credentials directly into MyApp/build.gradle file.
You can do it like this:
apply plugin 'android'

android {

  // some other gradle magic

  signingConfigs {
    release {
      storeFile     file("path/to/your/keystore.release")
      storePassword "**********"
      keyAlias      "******"
      keyPassword   "**********"
    }
  }

  buildTypes {
    release {
      signingConfig signingConfigs.release
    }
  }

}
WARN: If you’ve made ANY COMMITS while using this flow, IT IS NOT SAFE FOR YOU TO EVER OPEN-SOURCE THIS REPOSITORY!!!
Shared Repo flow
This flow is basically the same as Convenient flow, but instead of hard-coding values in a
MyApp/build.gradle file, you will be asked to type them in your console each time you’ll make a production build.
apply plugin 'android'

android {

  // some other gradle magic

  signingConfigs {
    release {
      storeFile     file( System.console().readLine("\n\$ Enter keystore path: "))
      storePassword       System.console().readPassword("\n\$ Enter keystore password: ")
      keyAlias            System.console().readLine("\n\$ Enter key alias: ")
      keyPassword         System.console().readPassword("\n\$ Enter key password: ")
    }
  }

  buildTypes {
    release {
      signingConfig signingConfigs.release
    }
  }

}
WARN: This flow will only work if you have gradle daemon DISABLED, otherwise System.console() will be null, and
your script will crash. You can overcome this using SwingBuilder library, and here’s how.
Awesome flow
This flow is both convenient and repo-friendly. You will never have to type credentials again, and you won’t have problems with publishing to repositories.
First of all, you have to create signing.properties file, in the root of our project:
STORE_FILE=/home/<user>/path/to/your/keystore.release
STORE_PASSWORD=keySt0reP4s5word
KEY_ALIAS=keyName
KEY_PASSWORD=KeyPas5word
Now, edit MyApp/build.gradle:
apply plugin: 'android'

android {

  // some other gradle magic

  signingConfigs {
    release
  }
  buildTypes {
    release {
      signingConfig signingConfigs.release

      // that will output files named:
      //   MyApp-release-<versionName>-build<versionCode>.apk
      applicationVariants.all { variant ->
        def file = variant.outputFile
        variant.outputFile = new File(

          // override this to change output directory
          (String) file.parent,

          (String) file.name.replace(
            ".apk",

            // alter this string to change output file name
            "-" + defaultConfig.versionName + "-build" + defaultConfig.versionCode + ".apk"
          )
        )
      }

    }
  }
}

def propFile = file('../signing.properties')
if( propFile.canRead() ) {
  def Properties p = new Properties()
  p.load(new FileInputStream(propFile))

  if( p!=null
  &&  p.containsKey('STORE_FILE')
  &&  p.containsKey('STORE_PASSWORD')
  &&  p.containsKey('KEY_ALIAS')
  &&  p.containsKey('KEY_PASSWORD')
  ) {
    println "RELEASE_BUILD: Signing..."

    android.signingConfigs.release.storeFile = file( p['STORE_FILE'] )
    android.signingConfigs.release.storePassword = p['STORE_PASSWORD']
    android.signingConfigs.release.keyAlias = p['KEY_ALIAS']
    android.signingConfigs.release.keyPassword = p['KEY_PASSWORD']

  } else {
    println "RELEASE_BUILD: Required properties in signing.properties are missing"
    android.buildTypes.release.signingConfig = null
  }

} else {
  println "RELEASE_BUILD: signing.properties not found"
  android.buildTypes.release.signingProperties = null
}
Add this line to your .gitignore:
# ...

signing.properties
I frequently include signing.properties.template file with fake data, so others will know how to structure data inside
it:
STORE_FILE=/path/to/your/keystore.release
STORE_PASSWORD=password
KEY_ALIAS=key_name
KEY_PASSWORD=password
This flow is almost perfect for me, but there are still things I could see improved:
automatically rename output files to include,versionNamechange output directory to some external location,- fix for those things is now included above. It was provided by awesome guys from +Mycelium
If you know how to do it contact me or leave a comment below.
Perfect flow
This flow automates all of your builds, is 100% repo-friendly, makes your script slick and elegant, and allows you to easily set up output dir and output file name.
First, create a gradle.properties file. This file is automatically included in all of your build.gradle
files, so we won’t have to handle that manually.
NOTE: OUTPUT_DIR will be used only if you provide valid and existing path.
STORE_FILE=/home/<user>/path/to/your/keystore.release
STORE_PASSWORD=keySt0reP4s5word
KEY_ALIAS=keyName
KEY_PASSWORD=KeyPas5word
OUTPUT_DIR=
now in MyApp/build.gradle put:
apply plugin: 'android'

android {

  // some other gradle magic

  signingConfigs {
    release {
      storeFile     file(STORE_FILE)
      storePassword STORE_PASSWORD
      keyAlias      KEY_ALIAS
      keyPassword   KEY_PASSWORD
    }
  }
  buildTypes {
    release {
      signingConfig signingConfigs.release

      // this is used to alter output directory and file name. If you don't need it
      // you can safely comment it out.
      applicationVariants.all { variant ->
        def file = variant.outputFile

        String parent = file.parent
        if( project.hasProperty('OUTPUT_DIR') && new File( (String)OUTPUT_DIR ).exists() )
          parent = OUTPUT_DIR

        variant.outputFile = new File(
          parent,
          (String) file.name.replace(
            ".apk",

            // alter this string to change output file name
            "-" + defaultConfig.versionName + "-build" + defaultConfig.versionCode + ".apk"
          )
        )
      }
      // end your comment here
    }
  }
}
Last required thing is to add this to your .gitignore file:
# ...

gradle.properties
WARN: if you already had this file in your repo, you’ll have to run git rm --cached gradle.properties first.
Optionally, include gradle.properties.template so others will know how to write their properties file:
STORE_FILE=/path/to/your/keystore.release
STORE_PASSWORD=password
KEY_ALIAS=key_name
KEY_PASSWORD=password
OUTPUT_DIR=
Other things worth remembering:
- before building, increase both
versionCodeandversionNamein yourMyApp/build.gradlefile, - it’s a good idea to move as much data from
AndroidManifest.xmlto yourbuild.gradleas possible.
Beginning...
Several days ago I was casually browsing awesomness of Github when I saw this project by koush, and instantly understood that’s the blogging flow I could use - write in sublime and publish/deploy from terminal.
I had to do some cleanup there, update & fix some dependencies and rewrite parts of it to a better language.
Later, I’ve created a new Heroku instance, moved my domain to a heroku Add-on called pointDNS,
did git push heroku, and it worked great :). I still have some styling to do, though…
So let’s go through it step by step (WARNING that may be boring if you don’t like details):
Cleanup
There was quite a bunch of code I wasn’t going to use.
package.json
I have moved dependencies from being hardcoded in node_modules folder to a proper dependencies section in package.json
file. I prefer stuff on CDN’s, so I had to re-link some things, like Bootstrap or jQuery
(required by, but not bundled with Bootstrap).
I’ve restructured some view files, removed almost all styles and left only two .less files with very small changes to a default Bootstrap theme.
Upgrades
From the start I wanted to use only the newest packages, and as it usually is, some things weren’t yet compatible…
poet
First problem I’ve encountered was an instant crash poet was experiencing when I
tried friending it with express v4.x, where app.locals
is no longer a function, and I had to
handle it like this (I’ve used underscore,
only because it was already required there). As I didn’t wanted to wait for someone to merge my PR, I decided to
link to own repo
in package.json.
After that express hit me with a lot of structure changes - they’ve decided to move a lot of stuff out
of the main repo. So I had to add dependencies in package.json, and require them accordingly in my app.coffee file.
markdown + highlighting
Originally markdown was used, but it had no proper highlighting hooks (some crazy regular expression was being used), it didn’t have support for GFC (empty lines in code blocks were breaking formatting of an entire post) and actual formatting was happening in a python-pygments library, that was accessed by some other python files, and… Yeah, I simplified this by using a surprisingly great marked npm module, that was insanely easy to integrate with highlight.js:
marked.setOptions
  highlight: (code, lang) ->
    hljs.highlight(lang, code).value
Obviously it couldn’t be that easy and some problems had to emerge: code block background was always white, and if I
wrapped code with a div with .hljs class, background had wrong shape. But one quick PR
solved that isse for me.
Heroku
Deploying on Heroku, was way easier than I expected. Basically the only two things I had to do was, to create a Procfile
containing only: web: npm start. And add coffee-script dependency to my package.json file, since I prefer running
coffeescript directly than compiling it to js, and then running it.
Little Things
I hate when things annoy me with their little warnings, and so was html-to-text module:
npm WARN package.json html-to-text@0.0.8 No repository field.
Luckily one little PR solved this issue.