Redundant intro
As I started my Android journey with Eclipse I was used to wizards like this:
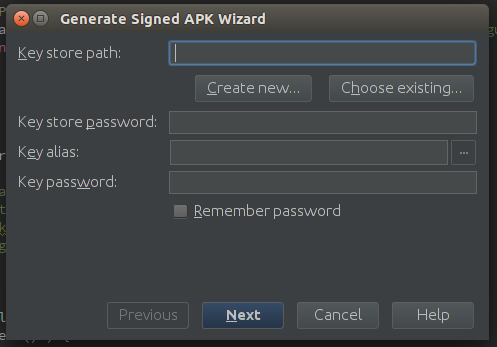
So, you can imagine my surprise when this happened (if you can’t access this link click here). It was unexpected, but pushed me to learn more about Gradle build system. At first gradle docs seemed really overwhelming, because they were covering so much more than only publishing production builds (more about that in my future posts).
Step 1 - Know what to click
That’s something extremely simple and crucial to make anything else work, yet it took me quite some time to find out.
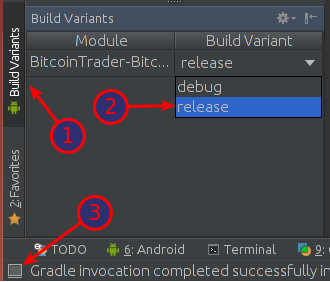
In your Android Studio press 1 to reveal Build Variants menu, then from a dropdown list 2 select release variant. If those border tabs are not visible you can reveal them by pressing 3.
NOTE: don’t worry if you don’t have release there yet - it will show up once we write our script.
Step 2 - Know “the code”
I have evolved through 3 different flows until I’ve found the one I like the most. As the last one is also the most complex I’ll cover all 3 of them, so you can choose the one you like to most:
I have evolved through 4 different flows. Last one was created with help from +Mycelium and +Hugo Visser after I’ve published that post.
- Convenient flow - keep credentials in
build.gradlefile, - Shared Repo flow - input credentials in console,
- Awesome flow - keep credentials in a separate and
.gitignored file, - Perfect flow - Similar to Awesome, but way slicker!
Step 3 - Know where to look
Last thing you must do is to actually retrieve your awesome .apk file. This is quite straight forward, but you have to leave your IDE and point your file manager to:
cd MyProject/MyApp/build/apk/
The only file that interests you now is called: MyApp-release.apk.
I usually copy that file to some external directory, and rename it to sth like: MyApp-<versionName>.apk
Flows
Convenient flow
This flow is really simple all you have to do is to just input your credentials directly into MyApp/build.gradle file. You can do it like this:
apply plugin 'android'

android {

  // some other gradle magic

  signingConfigs {
    release {
      storeFile     file("path/to/your/keystore.release")
      storePassword "**********"
      keyAlias      "******"
      keyPassword   "**********"
    }
  }

  buildTypes {
    release {
      signingConfig signingConfigs.release
    }
  }

}
WARN: If you’ve made ANY COMMITS while using this flow, IT IS NOT SAFE FOR YOU TO EVER OPEN-SOURCE THIS REPOSITORY!!!
Shared Repo flow
This flow is basically the same as Convenient flow, but instead of hard-coding values in a MyApp/build.gradle file, you will be asked to type them in your console each time you’ll make a production build.
apply plugin 'android'

android {

  // some other gradle magic

  signingConfigs {
    release {
      storeFile     file( System.console().readLine("\n\$ Enter keystore path: "))
      storePassword       System.console().readPassword("\n\$ Enter keystore password: ")
      keyAlias            System.console().readLine("\n\$ Enter key alias: ")
      keyPassword         System.console().readPassword("\n\$ Enter key password: ")
    }
  }

  buildTypes {
    release {
      signingConfig signingConfigs.release
    }
  }

}
WARN: This flow will only work if you have gradle daemon DISABLED, otherwise System.console() will be null, and
your script will crash. You can overcome this using SwingBuilder library, and here’s how.
Awesome flow
This flow is both convenient and repo-friendly. You will never have to type credentials again, and you won’t have problems with publishing to repositories.
First of all, you have to create signing.properties file, in the root of our project:
STORE_FILE=/home/<user>/path/to/your/keystore.release
STORE_PASSWORD=keySt0reP4s5word
KEY_ALIAS=keyName
KEY_PASSWORD=KeyPas5word
Now, edit MyApp/build.gradle:
apply plugin: 'android'

android {

  // some other gradle magic

  signingConfigs {
    release
  }
  buildTypes {
    release {
      signingConfig signingConfigs.release

      // that will output files named:
      //   MyApp-release-<versionName>-build<versionCode>.apk
      applicationVariants.all { variant ->
        def file = variant.outputFile
        variant.outputFile = new File(

          // override this to change output directory
          (String) file.parent,

          (String) file.name.replace(
            ".apk",

            // alter this string to change output file name
            "-" + defaultConfig.versionName + "-build" + defaultConfig.versionCode + ".apk"
          )
        )
      }

    }
  }
}

def propFile = file('../signing.properties')
if( propFile.canRead() ) {
  def Properties p = new Properties()
  p.load(new FileInputStream(propFile))

  if( p!=null
  &&  p.containsKey('STORE_FILE')
  &&  p.containsKey('STORE_PASSWORD')
  &&  p.containsKey('KEY_ALIAS')
  &&  p.containsKey('KEY_PASSWORD')
  ) {
    println "RELEASE_BUILD: Signing..."

    android.signingConfigs.release.storeFile = file( p['STORE_FILE'] )
    android.signingConfigs.release.storePassword = p['STORE_PASSWORD']
    android.signingConfigs.release.keyAlias = p['KEY_ALIAS']
    android.signingConfigs.release.keyPassword = p['KEY_PASSWORD']

  } else {
    println "RELEASE_BUILD: Required properties in signing.properties are missing"
    android.buildTypes.release.signingConfig = null
  }

} else {
  println "RELEASE_BUILD: signing.properties not found"
  android.buildTypes.release.signingProperties = null
}
Add this line to your .gitignore:
# ...

signing.properties
I frequently include signing.properties.template file with fake data, so others will know how to structure data inside it:
STORE_FILE=/path/to/your/keystore.release
STORE_PASSWORD=password
KEY_ALIAS=key_name
KEY_PASSWORD=password
This flow is almost perfect for me, but there are still things I could see improved:
automatically rename output files to include,versionNamechange output directory to some external location,- fix for those things is now included above. It was provided by awesome guys from +Mycelium
If you know how to do it contact me or leave a comment below.
Perfect flow
This flow automates all of your builds, is 100% repo-friendly, makes your script slick and elegant, and allows you to easily set up output dir and output file name.
First, create a gradle.properties file. This file is automatically included in all of your build.gradle files, so we won’t have to handle that manually.
NOTE: OUTPUT_DIR will be used only if you provide valid and existing path.
STORE_FILE=/home/<user>/path/to/your/keystore.release
STORE_PASSWORD=keySt0reP4s5word
KEY_ALIAS=keyName
KEY_PASSWORD=KeyPas5word
OUTPUT_DIR=
now in MyApp/build.gradle put:
apply plugin: 'android'

android {

  // some other gradle magic

  signingConfigs {
    release {
      storeFile     file(STORE_FILE)
      storePassword STORE_PASSWORD
      keyAlias      KEY_ALIAS
      keyPassword   KEY_PASSWORD
    }
  }
  buildTypes {
    release {
      signingConfig signingConfigs.release

      // this is used to alter output directory and file name. If you don't need it
      // you can safely comment it out.
      applicationVariants.all { variant ->
        def file = variant.outputFile

        String parent = file.parent
        if( project.hasProperty('OUTPUT_DIR') && new File( (String)OUTPUT_DIR ).exists() )
          parent = OUTPUT_DIR

        variant.outputFile = new File(
          parent,
          (String) file.name.replace(
            ".apk",

            // alter this string to change output file name
            "-" + defaultConfig.versionName + "-build" + defaultConfig.versionCode + ".apk"
          )
        )
      }
      // end your comment here
    }
  }
}
Last required thing is to add this to your .gitignore file:
# ...

gradle.properties
WARN: if you already had this file in your repo, you’ll have to run git rm --cached gradle.properties first.
Optionally, include gradle.properties.template so others will know how to write their properties file:
STORE_FILE=/path/to/your/keystore.release
STORE_PASSWORD=password
KEY_ALIAS=key_name
KEY_PASSWORD=password
OUTPUT_DIR=
Other things worth remembering:
- before building, increase both
versionCodeandversionNamein yourMyApp/build.gradlefile, - it’s a good idea to move as much data from
AndroidManifest.xmlto yourbuild.gradleas possible.